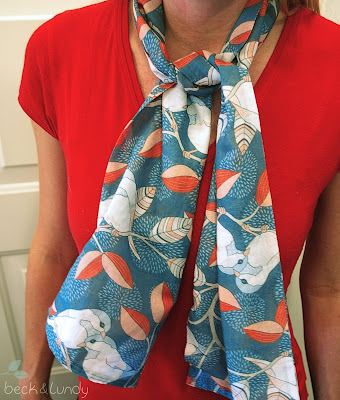
Down here in Texas, we have no need for thick knitted scarves, as gorgeous as they are, because winter lasts all of about 5 days… but we still like to be stylish! So, I recently ordered my first batch of Spoonflower fabric on the sheer-ish cotton voile, specifically for this purpose and am very pleased. I immediately set to work sewing up this sweet little scarf, taking photos along the way so I could share it. The fabric I’m using is one of my original designs, “Love Birds – Twilight” and you can find it and other color variations here. The silk crepe de chine or the cotton silk fabrics are also lightweight and lovely options.
To start with, I washed my fabric first, as a precaution. Even though this is made of one continuous piece of fabric and there’s probably little risk of it shrinking unevenly or puckering after laundering, I don’t like to chance it.
Then just cut a long, rectanglular piece that is equal to the length you desire by twice the width plus extra for hemming all the way around. For reference, my beginning dimensions were approx. 18″ wide x 54″ long.
As this fabric is only printed on one side, I chose to fold my fabric over so the underside doesn’t show, simply line up long edges, right sides together, and pin. (If you don’t mind the unprinted side showing, you could simply hem all the edges under and have a scarf that’s twice as wide.
Now stitch along the length of the pinned edge, (I used a 3/8 in. seam allowance), securing both ends with a few backstitches.
Turn your fabric right side out.
You should end up with a long tube with open ends that looks like this.
Using an iron, turn under the edges of the open ends as shown here. It will take a bit of maneuvering but you should be able to keep rotating your fabric as you iron until you make it back to where you started.
Line up your pressed edge carefully, and pin. When doing so, I like to make sure the seam that runs up the length of the scarf is on the outermost edge and not in the middle somewhere.
Now simply topstitch across both ends. You can opt for a single line of stitching, or a double row, I’ve shown both here. If you choose the single row, you might want to stitch a little closer to the edge of the scarf.
This stitching will be completely visible, so instead of backstitching at the start and end, I leave extra long tails on my thread so I can go back later with a needle, and pull them all to one side. Then I tie matching threads together in teeny tiny knots and trim them very close. I think this finishes it off nicely. My backstitching on the machine tends to not be so pretty as it usually ends up not going over the existing stitches, but going off at an odd angle, especially on thinner fabrics that move a lot.
And that’s it.. you’re done!
Now wrap it around your neck and enjoy your stylish self!


